 Save
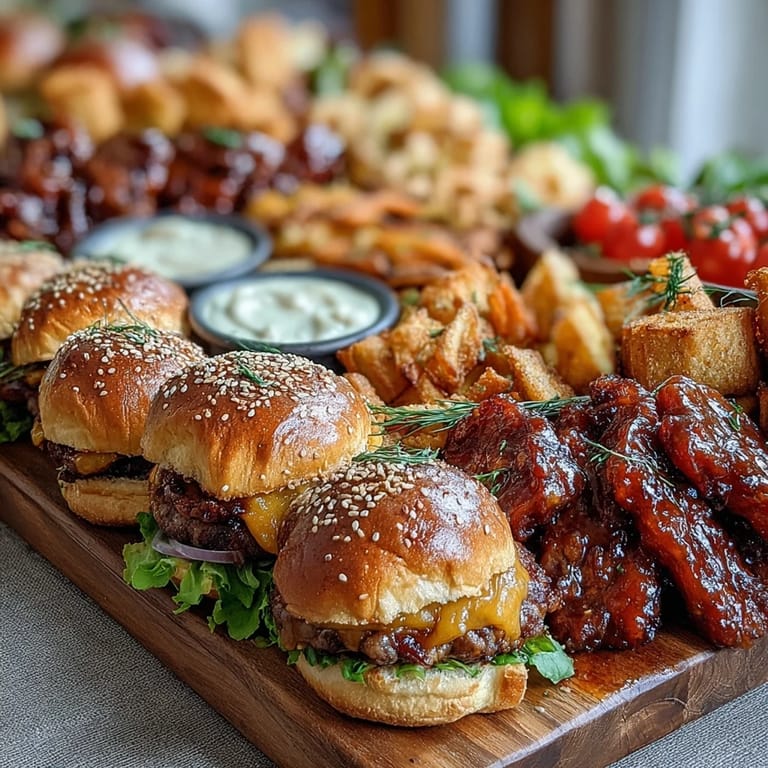
Save My sister called me three weeks before her baby shower in a mild panic—she wanted something that looked impressive but wouldn't trap her in the kitchen while guests arrived. I suggested a snack board, and her face lit up like I'd just offered her the secret to hosting. What started as a practical solution turned into this beautiful, colorful spread that somehow manages to feel both casual and celebratory, with those little BBQ sliders stealing the show every single time.
I'll never forget watching my sister's guests cluster around that board like it was the most natural gathering point in the room. Someone's husband kept coming back for thirds on the sliders, and I caught three different people sneaking extra dill pickles when they thought nobody was looking. That's when I realized this wasn't just a snack board—it was a conversation starter, a reason for people to linger and enjoy each other's company over something genuinely delicious.
Ingredients
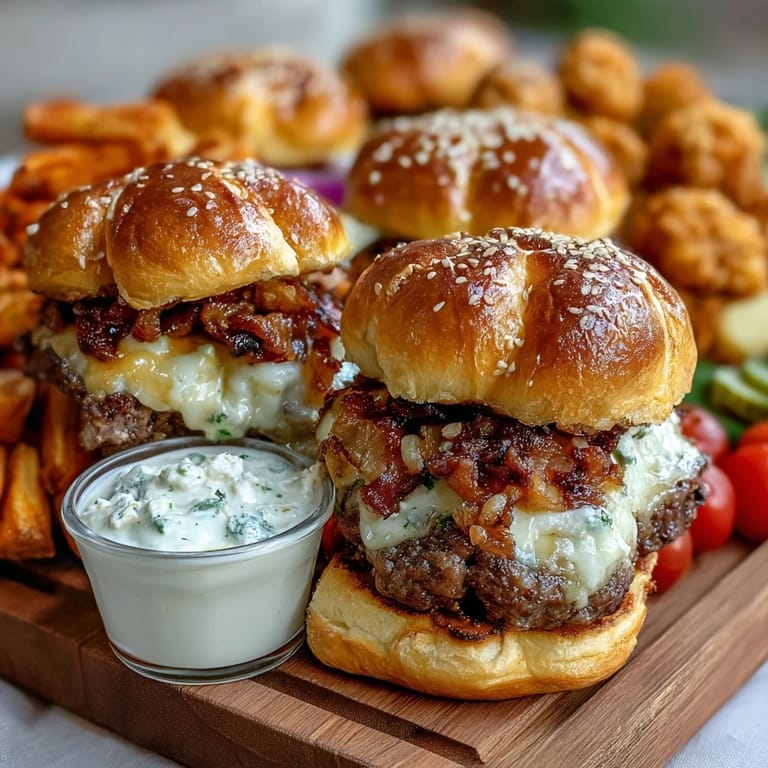
- Ground beef (500 g): The heart of your sliders—use 80/20 blend for the best flavor and texture, and don't overwork it when mixing or your patties will become tough and dense.
- Smoked paprika (1 tsp): This is what gives the sliders that subtle barbecue depth without overpowering everything else.
- Mini slider buns (8-10): Hunt for the ones with a slight sweetness; they toast beautifully and hold the fillings without falling apart.
- Cheddar cheese (4 slices): Quarter them so they melt evenly and cover each patty without hanging over the edges.
- Butter and sesame seeds: These turn the bun tops into something golden and irresistible—the sesame seeds add visual appeal and a subtle nutty note.
- Red onion, dill pickles, lettuce: These toppings provide brightness and texture; the pickles are honestly what make people reach for seconds.
- Assorted chips (400 g total): Mix at least three types to create visual interest and give people choices—the variety is what makes the board feel generous.
- Fresh vegetables (5 cups): Choose the crunchiest options available; they should look vibrant and feel crisp, not soft or sad.
- Dips (1.5 cups total): Use quality store-bought options or make your own ranch—they're the quiet heroes that tie everything together.
Tired of Takeout? 🥡
Get 10 meals you can make faster than delivery arrives. Seriously.
One email. No spam. Unsubscribe anytime.
Instructions
- Preheat and prepare:
- Get your oven to 180°C (350°F) and gather all your ingredients within arm's reach—this is where the flow of the whole project lives.
- Mix your slider meat:
- Combine the ground beef with salt, pepper, smoked paprika, and BBQ sauce in a bowl, stirring gently until just mixed together. Overworking the meat is the one mistake that makes sliders tough, so treat it like you're folding in whipped cream, not kneading dough.
- Form and cook the patties:
- Shape the mixture into 8–10 small patties about the size of your palm, then heat your grill pan or skillet over medium-high heat until it's hot enough that a drop of water sizzles immediately. Cook each patty for 3–4 minutes per side until you see a nice brown crust forming.
- Melt the cheese:
- In the last minute of cooking, lay a quarter-slice of cheddar on each patty and let it melt from the residual heat—don't cover the pan, just let it happen naturally.
- Toast the buns:
- Split your slider buns and brush the cut sides with melted butter, then sprinkle sesame seeds over the tops. Toast them in the oven for 3–5 minutes until they're golden and smell absolutely incredible.
- Assemble with intention:
- Layer lettuce first, then the cheese-topped patty, followed by a slice of red onion, a dill pickle, and a small dollop of extra BBQ sauce. The order matters because it holds everything stable and lets flavors build as you bite through.
- Build your board:
- Arrange the sliders on a large platter first, then nestle different chip varieties into the gaps, creating little clusters of color. Position your fresh vegetables in groups rather than scattering them randomly—it looks more intentional and inviting.
- Add the dips:
- Pour your ranch, hummus, and BBQ sauce into small bowls and place them strategically around the board where they're easy to reach but not crowding the main attractions.
- Serve fresh:
- Bring everything to the table right before guests arrive so the chips stay crispy and the vegetables maintain their snap.
 Save
Save I think the real magic of this board isn't just the food—it's how it gives people permission to graze, chat, and enjoy themselves without anyone feeling like they need to sit down for a formal meal. There's something wonderfully relaxed about standing around a beautiful spread, talking and eating at your own pace.
Customizing Your Board for Any Crowd
The beauty of a snack board is that you can adjust it based on who's coming and what you know they love. For a vegetarian-heavy group, make half the sliders with a plant-based ground meat alternative—honestly, they cook the same way and nobody can tell the difference once they're topped with cheese and pickles. If someone has a dairy allergy, swap in dairy-free cheese and keep a separate small bowl of their dips. I've made this board with ground turkey, ground chicken, and even a mix of both, and each version has its own quiet charm.
The Art of Strategic Arrangement
How you arrange a snack board actually matters more than most people realize—it's the difference between something that looks thrown together and something that feels thoughtfully prepared. Start with your sliders as the anchor, then fill gaps with chips in varied heights and colors, grouping similar vegetables together so the board has visual rhythm. I learned this the hard way after creating a chaotic first board where everything blended together and looked messy instead of abundant. Now I think of it like painting with food—warm colors next to cool ones, crunchy items near creamy dips, tall elements beside flat ones.
Make-Ahead Strategy and Storage
This is where the board becomes genuinely practical for hosting—you can do almost everything the morning of without stress. Slice your vegetables and arrange them in containers with damp paper towels to keep them crisp, toast your buns and store them in an airtight container, and cook your slider patties ahead if you prefer. The only thing to do last is assemble the board and add the warm sliders right before guests arrive so everything feels fresh and intentional.
- Toast the buns a few hours ahead and reheat them gently in a 150°C oven for just 2 minutes before adding the hot sliders.
- Keep your vegetables in the coldest part of the fridge with damp paper towels so they stay crisp and hydrated until serving.
- Mix your slider seasonings the night before if you want to save morning time—just form the patties fresh so they cook perfectly.
 Save
Save This board has become my go-to for any gathering where I want something beautiful and delicious without disappearing into the kitchen. It's proof that simple ingredients, thoughtful arrangement, and a little care create something that feels generous and fun.